– Microscapes –
Fine Art Microscope Photography
Whatever you choose for your experiments with microscope photography, with a bit of patience you will be rewarded with a completely new world of creative opportunities. Every slide is just like the surface of an unexplored land, and your microscope is like a space station that orbits above it. Each and every one of these lands is different and unique, and you will soon recognize that the possibilities are simply limitless.
*please click on the pictures if you want to see them larger
How it started out
I am a landscape photographer, and I am also a professional photographer, meaning with this that I work every day for making a living out of it. For this reason, I am usually very, very busy. If I’m not out shooting for my customers, I’m probably out shooting for my own projects. And when I’m not out shooting, I’m out in any case, maybe leading a private workshop or tour somewhere in the Alps, or in Venice, Tuscany, Cinque Terre, etc.
When I’m back home, I have a whole lot of other tasks to fulfill, such as processing and keywording images, staying in touch with my estabished customers and possibly finding new, updating my websites, marketing my websites and my photographs and services online and offline, writing a blog post, invoicing my customers, paying taxes (ouch!), updating my social network profiles by posting new stuff and commenting on others’, etc. etc. etc.
Anyway, there is at least a period every year that is relatively quiet for me, and this often happens to be in winter. I normally use these few weeks between December and January for dealing with unprocessed images that have remained sitting in my hard drives for too long, and for thinking about new projects.
Sometime ago, in one of these breaks, I started working at re-organizing and storing my archives of old 35mm and medium format slides and negatives, and I stumbled upon 4-5 boxes containing a number of 35mm slides that I immediately recognized as the pictures my father took with a microscope he purchased about 30 years ago.
My father was a photographer himself who loved the outdoor life, hiking in the Alps and taking b&w landscape pictures, and he happened to transmit to me all his passions. But he was also a man affected by an insatiable curiosity about everything, always eager to make experiments and learning new things. I remember he had bought this china-made optical microscope with the declared intent of taking pictures with it, but for some reasons it didn’t work out, and after a few attempts he gave up, and the microscope was stored on a shelf in my parents house’s basement, where it collected dust for decades.
Despite the heavy vignetting on the corners, those slides looked very nice actually, with vibrant colours and wonderful textures and shapes, but when I gave them a closer look with a loupe magnifier, I finally realized why my father gave up with it; they were all unsharp.
One of the toughest problems one has to deal with, when taking pictures with an optical microscope, is the complete lack of depth of field. I think the native depth of field of a microscope’s objective lens can be measured in microns (1/1000s of a millimeter), and stopping down of course is not an option as microscope’s lenses have not a diaphragm. As far as the subject is perfectly flat, it is in some way possible to deal with this strong limitation, and if you perfectly nail the focusing distance, you can obtain something that is sharp enough. But the subject my father had chosen for his pictures was sugar dissolved in water and then dehydrated. Sugar crystals are solid objects with a thickness that can reach several tenths of a millimeter, way beyond therefore the capability of the microscope. 30 years ago, modern digital cameras with all their astonishing features that nowadays we give for granted, were probably only in the dreams of Mr. Steven Sasson and perhaps a handful of other scientists. The camera my father used for his microscope photographs was a superb slr camera, a Contax RTS II. But of course it had not a display with live view and 10x magnification. Focusing only through the viewfinder had to be a kind of a nightmare, and succeding almost only a matter of luck.
“But now things are different” I thought. So, I pulled the microscope out of the shelf, carefully dust it off, and got it back on track again. Here are a few samples of what I was able to get, so far.

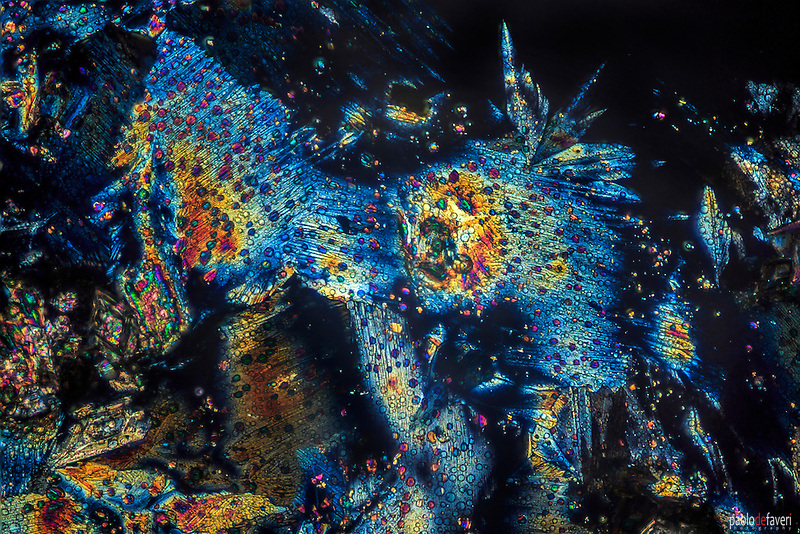
Grand Canyon – A view at the microscope of a mix of salt and sugar crystals on glass in polarized light. The “river” is actually a crack in the mass of sugar and salt, unveiling the glass beneath. A microscopic grand canyon in a colorful desert

A slice of the brain of an alien form of life perhaps? Not really, only acrylic glue in polarized light

Another take of the “renowned” Face on Mars. Again, no. Just sugar crystals in a bed of vinyl glue

A mix of sugar and salt cristals, in polarized light

Liquid Metal – White vinyl glue after a fast dehydration

Craters and Canals – Vinyl glue again, this time subjected to a very slow (natural) dehidration
 Sprayed drops of nails enamel on glass, forced to a fast drying up by mean of heat exposure (microwave oven)

Feathers – Big sugar crystals in polarized light
The Maya Dancer – Well, at least, that’s what I see in this picture! Crystals of aspirin drug (acetyl-salycilic acid) in polarized light.
Why taking microscope photographs
Well, because they’re nice of course! My main interest with microscope photography lies in discovering nice shapes and colours, and framing them into a beautiful, interesting and possibly eye-catching composition, that’s it.
Mine is not a scientific research. With only two years of chemistry classes attended at the high school more than 25 years ago, I’m not even remotely qualified for that! But it certainly is an artistic quest.
That said, I think what works best for my purpose, is either crystals tout-court, or in any case every material that through a dehydrating process produces crystals or something that looks similar. So far I made attempts with sugar, salt, vinyl glue, acrylic glue, nails enamel, aspirin, antibiotics, and I found they all work great in producing crystals or textures with nice shapes and details.
Preparing the slides
Preparing a slide with this kind of materials is very easy. For sugar, salt, drugs and similar things you just have to make a water solution, put a few drops on the slide and then let the water to evaporate. One thing that I noticed is that the shape and the size of crystals is strongly influenced by the rate (speed) of evaporation. A slow evaporation rate will usually produce big and multifaceted crystals. If you instead put the slide into the microwave oven and bake it for a minute or two at the maximum power, the evaporation rate will be extremely fast, and this will let on the slide only a thin layer of very small crystals. Both kind of crystals can work great when photographed, although they require a different approach because of the different thickness.
With things like glue or enamel the preparation process is a bit different of course, as you don’t need to make a water solution with this material, you will just put a drop or two of the substance on the slide, and then let it dry out. Anyway, putting this substances as well into the microwave oven can sometimes produce funny things, such as bubbles and craters.
Taking pictures
Once you have found something that looks interesting on the slide, it’s time to start shooting.
As I said, the main issue you have to deal with is the extremely shallow depth of field of the lenses of the microscope. Even if your subject looks perfectly flat, it probably is not. And if it is not, it will most likely fall beyond the capabilities of your microscope.
Extending the depth of field with the focus stacking technique
As you cannot stop down your microscope’s lens, there is only a way to overcome this problem: focus stacking. Instead of taking just one picture of your subject, you will take several shots of it, each of them at a slightly different focus distance so that every shot has at least something sharp in it. Afterward, you have to combine (stack) the sequence of shots into one image that hopefully will look sharp everywhere.
Before starting to shoot the sequence, remember to set the camera to manual, choose the shutter speed and colour balance that are more appropriate, and don’t change them anymore until you have finished, otherwise you will get images with different colours and brightness, that will not be easy to merge together.
If you shoot Raw, you have to do the same when you process the images, i.e. you need to choose a processing procedure once, and then apply it to the whole set of images.
When you have finished to shoot and process your sequence of images, it’s time to stack them together into one single image. There are many ways for doing focus stacking. For example, you can use the script of Photoshop that has been specifically designed for this: (Menu>File>Scripts>Load Files Into Stack…).
Honestly speaking though, I don’t think this Photoshop script does what it promises, it often produces alignment mistakes among layers, and sometimes it doesn’t identify correctly the sharp areas of the images to be stacked.
There are many third party tools that work great for focus stacking, some of them are completely free, and some are distributed as shareware software. Among these, the one that works best for me and that I currently use is Helicon Focus by Helicon Soft ltd. It’s a great tool, it manages to stack as many images as you like, it always succeed in identifying the sharp areas of each image, and the whole process is always flawless and quick.
At the end of the focus stacking process, you can open the stacked image in Photoshop and apply the final enhancements (contrast, saturation etc.)
A sequence of six images, each one focused to a slightly different distance…
 …and the resulting image after the focus stacking process, perfectly sharp everywhere.

The equipment
The microscope
For starting taking microscope pictures, you’re not going to break your bank ;).
You only need an optical microscope that is good enough, i.e. it has an acceptable optical quality, it is sturdy enough for bearing the weight of the camera, and with a powerful halogen bulb as the main source of illumination. There’s a wide range of microscopes designed for students and amateurs that will work great, and they normally sell between 250 and 500 EUR.
Mine as I said, was made in China in the 1980’s. I cannot tell anything about the manufacturer, as the company name is only written in Chinese characters. Anyway, the model ID as reported on the user manual is XSP-13A. Funny enough, I recently discovered on the internet that it is still available today, exactly the same model of 30 years ago!
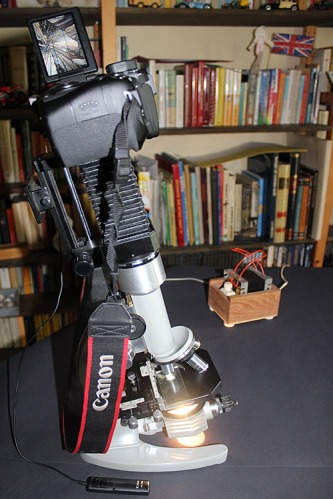

My microscope photography equipment
The adapter
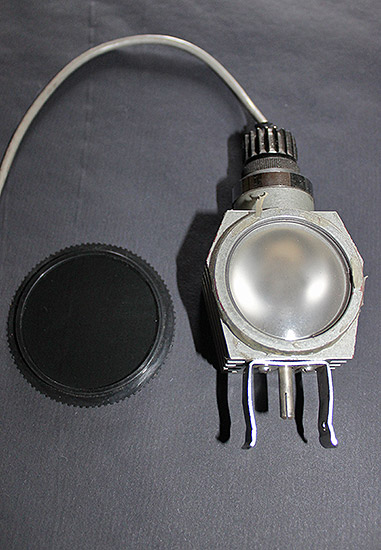
For mounting the camera onto the microscope, you need an adapter ring. This is basically a tube with a threaded ring on the microscope side and a bayonet ring on the camera side.
Mine is a custom-made adapter, with a Contax bayonet as my father’s camera was a Contax. So for using it with my Canon cameras I had to add another adapter ring. It can accommodate one eyepiece inside, the smallest that I have with a 5x magnification. Using an eyepiece is not a smart idea though. Sure, it will dramatically increase the overall magnification, but it will also produce a lot of vignetting (the eyepiece diameter is much smaller than the sensor) and it will also add a whole lot of new chromatic aberrations.

My custom-made adapter (with a C/Y batonet), and my old macro bellow
The camera
I normally use my Canon Eos 70D for my microscope photography. The 70D has a swing-out LCD screen that makes it possible to focus while sitting, and this can be more relaxing at times.
I have tried to take pictures with my 5D MkII as well, but it didn’t work because I always have vignetting as the camera sensor is too big for the size of the main tube of the microscope, which is only 32 mm. Sure, the adapter produces some magnification (it works like an extension tube after all) but this is apparently not enough for my 5DMkII. There are in any case adapters specifically designed for full frame cameras, for example those of Mecan Imaging.
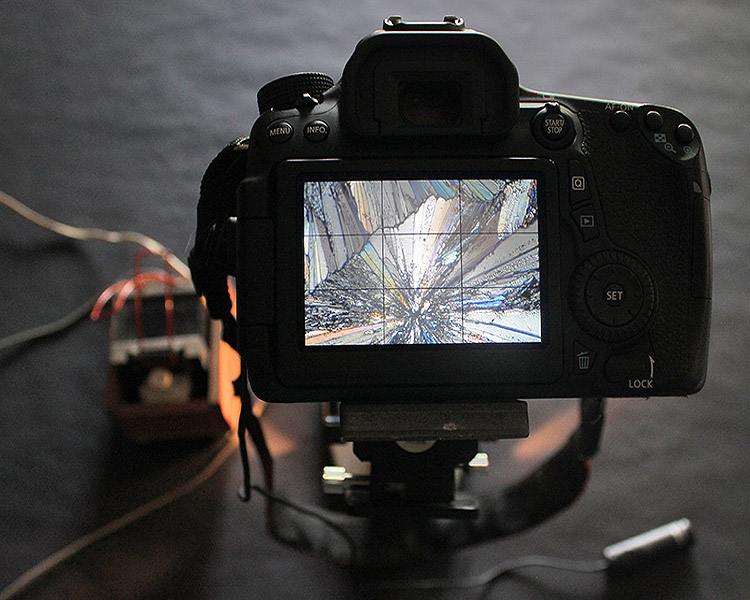
The live view of my Eos 70D is of great help when trying to focus on the smallest details
Other stuff
For taking good microscope photos, you absolutely need a polarizer filter. Seeing a slide in polarized light makes a huge difference, as the polarizer will dramatically increase the overall contrast of the scene, and it will also pull out wonderful colours, that are rather invisible without it. For polarizing the light, simply place the polarizer between the light source (i.e the halogen bulb) and the slide.
A bellow can sometimes help in reducing the vignetting issue when using a full frame camera, although in my case it wasn’t enough to completely resolve the problem. I used it with the 70D too as another way for increasing the magnification, and it worked great for this purpose of course.
Another useful accessory is a potentiometer or variable resistor, that allows to reduce the power and thus the luminosity produced by the bulb.
This is very useful when you have very bright areas on your slide. At full power these areas would probably be rendered as white by your camera sensor. Dimming the light can sometimes help to avoid this issue and also to discover subtle details in these very bright areas, otherwise invisible.
Finally, a remote shutter switch can help a lot in reducing vibrations.


The rest of my equipment: a powerful halogen bulb, a circular polarizer, and a home-made power transformer with a potentiometer
Resources

Prints for sale at


 A small lake, just slightly bigger than a pond, Lake Antorno is without any doubt the best vantage point for photographing the Tre Cime di Lavaredo (Drei Zinnen in German) either at sunrise or sunset. The Cadini di Misurina group and Mount Piana are also visible from this place. I took this picture on beautiful clear evening of mid June, this image is stitched from four vertical frames.
 Wild horses in the fields surrounding the Lake of Misurina, in the Dolomiti d’Ampezzo area. Many wildlife species live in the area of the Dolomites, such as deers, chamoises and ibexes, foxes, wolves and brown bears.
 Croda da Lago and Lastoi de Formin as seen from the Cinque Torri. Taken at sunset from the fields surrounding the Cinque Torri group, a small massif of five peaks in the Nuvolao range, not far from Cortina d’Ampezzo.
 A view at sunset of Croda rossa d’Ampezzo (Hohe Gaisl), Dolomiti, a massif placed at the border between Veneto and the province of Alto Adige / South Tyrol. Taken from the plateau at the foot of Tre Cime di Lavaredo/Drei Zinnen group
 The Castle and the small village of Arnaz (Schloss Buchenstein) nearby Livinallongo, with the peaks of the Settsass/Conturines range in the background.
 The Dolomites are not only about majestic peaks and ranges. There are also many beautiful forests, streams and lakes. This is Lake Ru Freddo, a small lake at the feet of Croda Rossa d’Ampezzo.
 A view of the amazing peaks known as Sasso Lungo and Sasso Piatto as seen from the small town of Canazei, with the rapids of Rio d’Antermont in the foreground.
 The jagged rocky peaks of the Dolomites known as Sasso Lungo and Sasso Piatto, emerging from the green prairies of Passo Sella, an high altitude pass linking Canazei to Selva di Val Gardena.
 Monte Cristallo, one of the many massifs in the dolomiti Bellunesi, under some ominous clouds. Taken about 1 hour before sunset on an evening of mid June, from the plains surrounding the Tre Cime di Lavaredo/Drei Zinnen.
 A classic view of the Odle range, an amazing dolomitic massif placed at the top of Val di Funes/Vilnosstal in Alto Adige/South Tyrol in Italy, with the small, wonderful chappel of Saint Johann in the foreground. It had be rainy and overcast most of the day, but the sky cleared off right in time for sunset, contributing a unique drama and mood to this stunning scenery.
 Some suggestive sun rays hit the small chappel of Saint Johann and the surrounding grass fields, as the sky starts to clearing-off after a mighty summer thunderstorm. Taken at the top of Val di Funes on an evening at the end of June, this is stitched from five vertical frames.
 Just another amazing peak of the Dolomites, known as Sass de Putia (Peitlerkofel in German) and it’s placed exactly at the intersection between Badia and Funes valleys at Passo Erbe, in the region of Alto Adige/South Tyrol, Italy.
  A flaming sunset at Lake Antorno, with the groups of Tre Cime and Cadini di Misurina in the background.